


4 Easy Ways to Optimize Images for Web
Optimize Images For Web
Whenever you begin thinking about your content strategy or developing something like a web page, you don’t want to get stuck in the trap of only thinking about the optimization of the text, because knowing how to optimize images for web is equally important. Taking the proper steps to optimize your images helps you rank in the search engines, and it can improve how people interact with your site, effectively improving your site’s user experience (UX). With that in mind, keep the following tips in mind whenever adding images to your online resource.
- Name Your Images
It’s easy (especially if your content incorporates a lot of images) to ignore this step and leave every image as the alphanumeric name assigned by your digital camera. However, search engines crawl every aspect of your site, and that means text as well as the names within those image files.
Approach image naming as carefully and thoroughly as you would article writing. While it’s OK to just name an image file something descriptive (and while that’s far preferred to leaving it the preassigned name), it’s better still to use keyword research to direct how you name that file.
Look into what search terms your customers are using to find specific products, and then name your image files accordingly. This will improve your overall on-page SEO, and it will help your images appear in search engines, which can be another significant way to direct potential customers to your site.
- Optimize Alt Tags
Image courtesy of WebMarketingPros.com.
If a website cannot display an image (for any number of reasons), an alt tag is the alternate text displayed in its place. Properly filling out an alt tag (again, using those keyword researched terms) is another way to boost your on-page SEO. It clearly alerts the search engines that those terms are associated with that image.
Some things to keep in mind with alt tags:
Do:
- Add an alt tag to every product image. If a given product has a serial number or model number, include that.
- Use plain, simple language.
Don’t:
- Don’t add an alt tag to a decorative image. Search engines can view this practice as over-optimization and levy a penalty.
- Don’t keyword stuff your alt tags. Just as search engines can penalize you for this practice in text, they can penalize you for it in alt tags too.
- Choose Your File Type Carefully
There are (generally) three types of image files you can use on your site: JPEG, GIF, and PNG. It’s important to know the difference between these file types because it can significantly change two important factors—page load time and image quality.
- JPEG: This is the oldest of the three file types, and it is by far the most common choice for web images. Compression is feasible with these file types, and that often means high quality with small size (less bytes).
- GIF: GIFs are generally lower quality than JPEGs. They are often used for very simple images, as they really only support a few colors well. (This file type does support animation, though.) If you’re looking to include a larger, more complex file, GIF is not the ideal choice.
- PNG: The primary benefit of a PNG over a GIF is that it simply supports more colors. The big benefit over a JPEG is that it doesn’t degrade in quality with subsequent resaves. PNGs, however, tend to be much larger files than JPEGs.
Here’s how these file types look and function in real life:
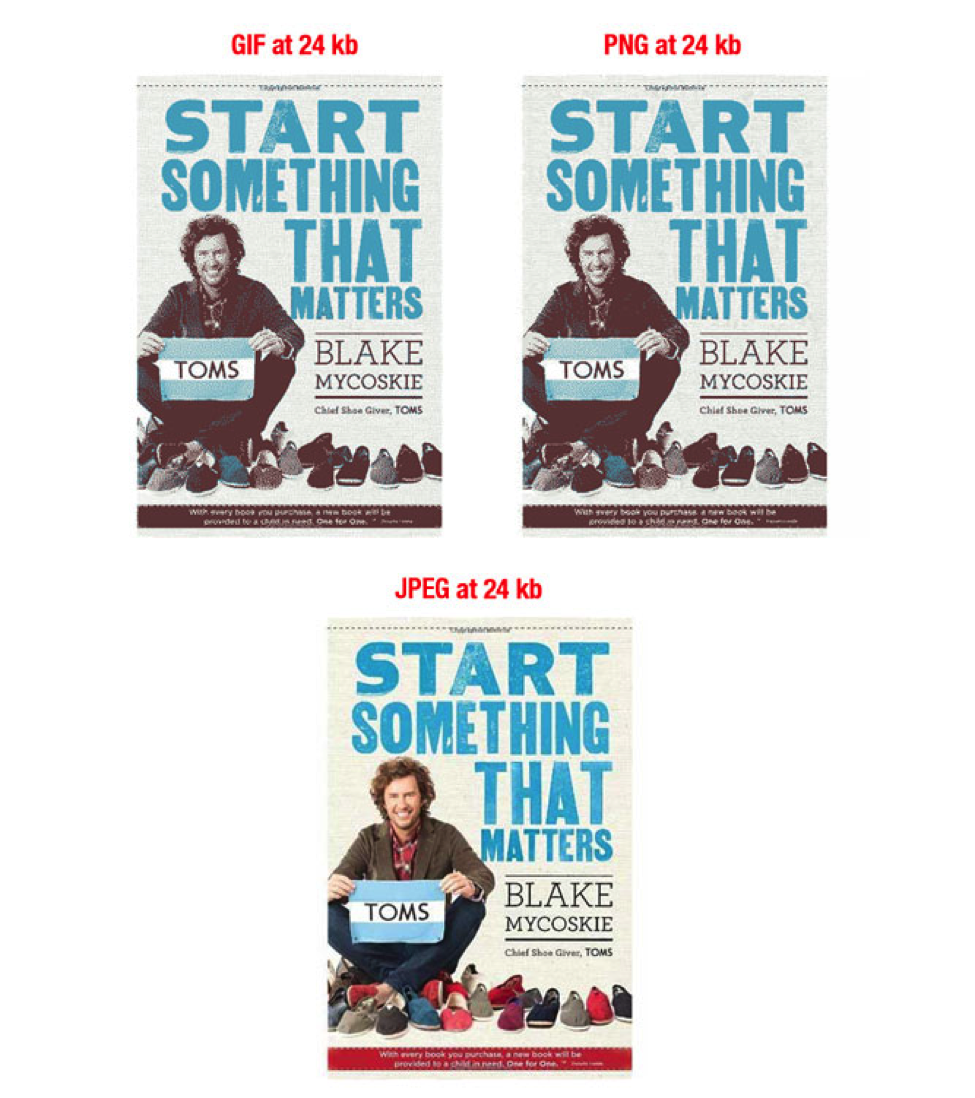
Image courtesy of Shopify.com.
JPEG obviously comes out on top in this example. Whatever image type you choose, just be cautious that it isn’t so large that it significantly reduces your page load speed but so small that it compromises the quality (and overall appeal) of the site.
- Apply File Type Knowledge to Site Design
Knowing what you know about JPEGs, GIFs, and PNGs, take another look at your site and smartly redesign. For example, simple decorative images (buttons, borders, background images, etc.) can safely be made with GIFs without compromising quality. Wherever possible, use CSS to create large blocks of colored areas rather than using images.
These kinds of tactics will help you keep a mindful watch on your page load speed without sacrificing image quality.
Bonus Optimization Advice
This is less about how to optimize the photos themselves and more about how to optimize the way in which photos function on a web page. That is, it concerns actual downloadable bytes and visual space.
Images can dominate a page and overwhelm a user or make the text visually insignificant. More importantly, though, too many images can significantly slow the load time of any given page, which quickly negates any benefits that user receives from the images.
This is not to say people should stop using images in their content. A balance just needs to be struck. Remember, an image should never just be added for the sake of adding an image. It should contribute significant value (unique or supplemental) to the text, or it should serve to break up an otherwise lengthy stretch of wordage.
Ask yourself if every given image is necessary. After all, if those images interfere with user experience through delayed page load, the costs will certainly outweigh the benefits. Also don’t forget that Google uses page load time as a factor within its ranking algorithm, so this can hurt you with the search engines and with potential customers.
Conclusion
Images are a vital part of any piece of content and should be thought of just as much as other marketing tactics, such as brand reputation or keyword research. Pictures capture a reader’s interest, break up large blocks of text, and add valuable information to the presented text. However, to ensure the site is as successful as possible (from a search engine perspective and in terms of UX), make sure to dedicate some time and thought to image optimization.
